Notifications

Article
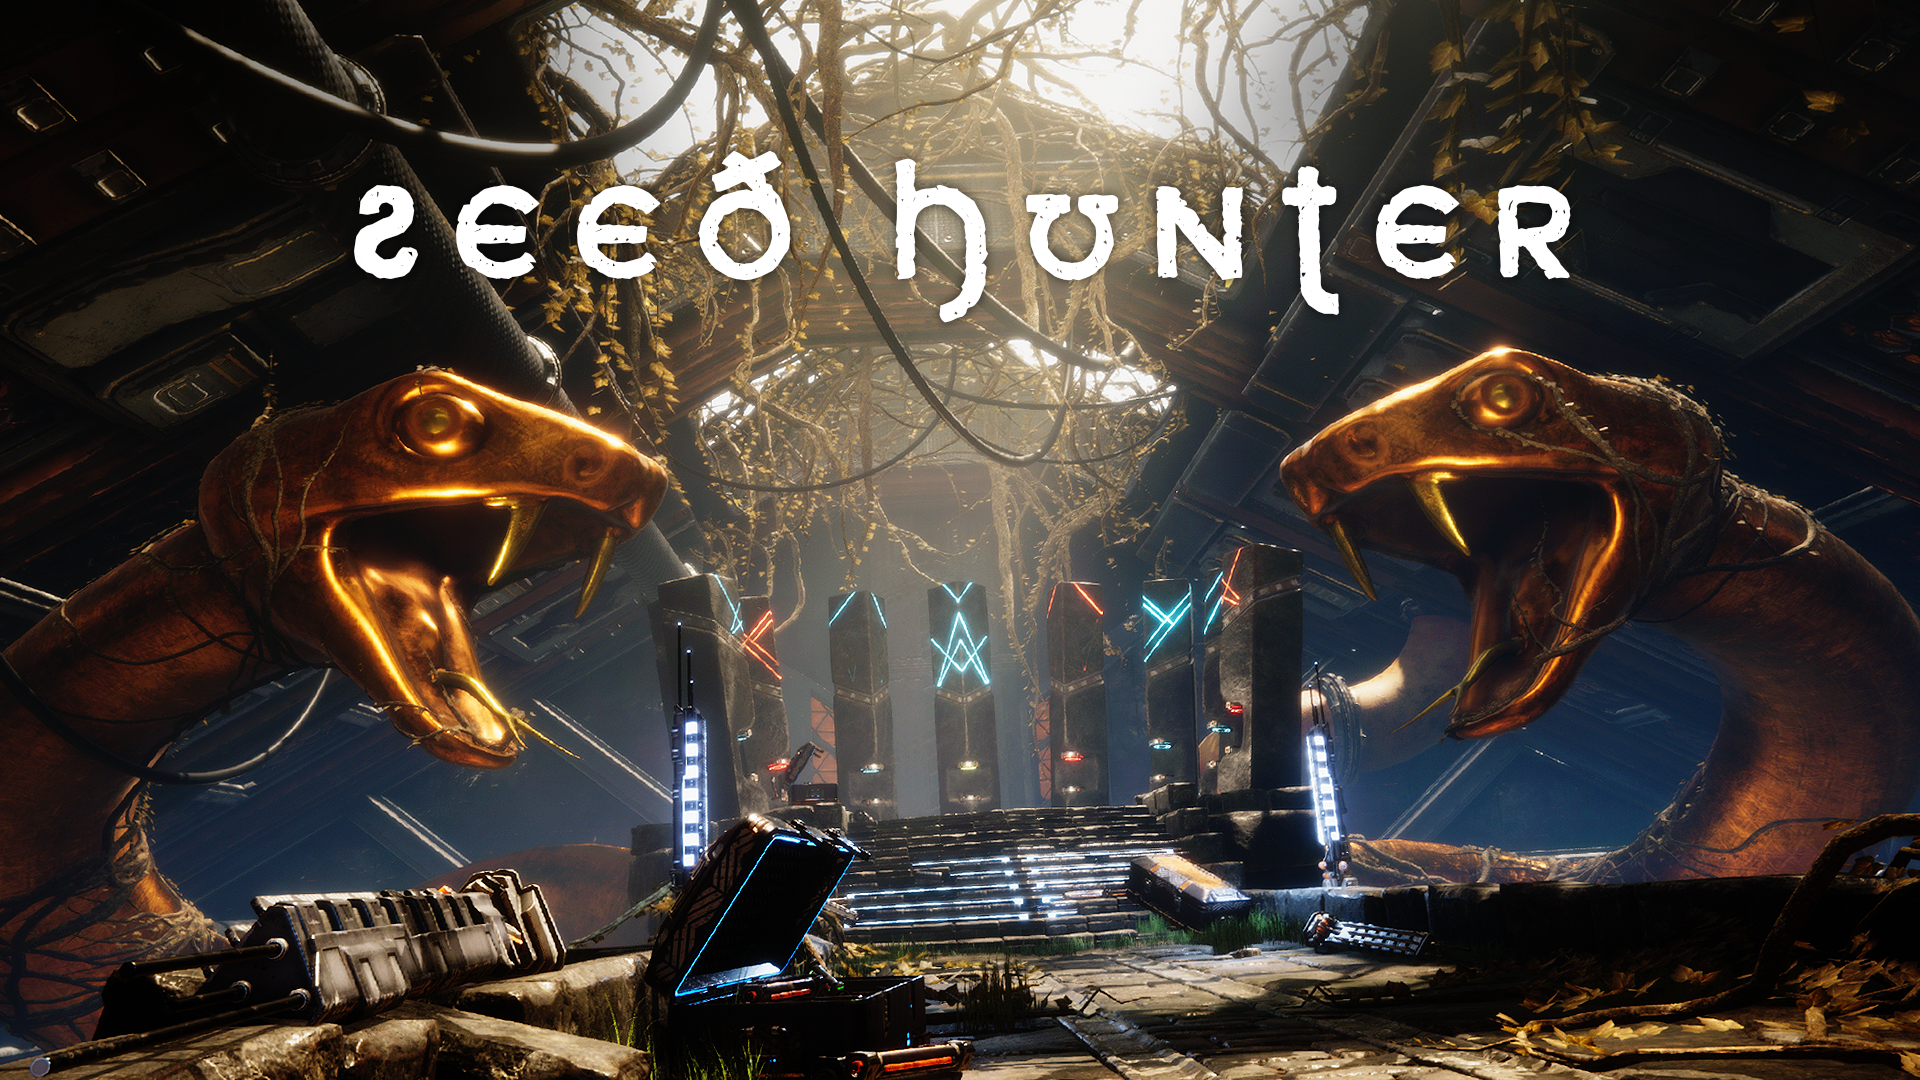
SEED HUNTER (Dev Diary)
Updated 5 years ago
1.8 K
13
0
In-depth look into the development of an award-winning environment of the Inside The Vault challenge using Unity 2019.1 and HDRP.
Introduction
Welcome to our development diary of the Seed Hunter environment pack, which we created from scratch in around 50 days (mostly evenings and weekends), excluding the promotional cinematic, which took another two months in much slower pace (after the challenge deadline). In general, over 500 hours were invested into the project, as we worked on it only in our spare time. So, let's jump straight into the organizational and technical aspects of the development.
Team
Our team consisted of two persons - Jan Zamazal and me (Pavel Koten). From my previous Unity Neon Challenge I knew things can consume a LOT of time to be done properly, so it was a bit of a relief to work in team this time around.
Jan, as an experienced prop artist, was mainly responsible for the detailed objects (crates, seed holders, light fixtures...) and key environment modules, such as floor, stairs, stone bridge with final platform or serpent twins.
I am more comfortable with worldbuilding and assembling everything together, so I took care of the project organization and building the scene, including blockout, lighting, post-processing etc. so Jan could solely focus on complex assets. However, it quickly turned out that the biggest chunk of work will be modeling and texturing, so we both ended up creating the assets for most of the time (mainly basic environment modules like walls, pipes or pillars on my end).
Since our approach was pretty agile, we were shifting roles quite often towards the end. When some asset took more time than planned, it was delegated to other person. That way I could put my hands on some hero assets as well (drone, main gate) while Jan for example constructed whole stone bridge with platform, basically whole set piece of the Chamber room.
Concept & Story
Overall concept was defined by the challenge itself - imagine what is inside the Yggdrasil vault set in the Buried Memories universe. It's an interesting idea of blending Nordic mythology with post-apocalyptic sci-fi filled with robots and tech, so we expanded on the idea of Yggdrasil, a tree growing through the nine worlds, and made sort of a seed bank inside the vault.
There are 9 pillars in the main chamber, each representing one continent on the planet Earth (well, we imagined some - it's post-apocalypse, right?). Through these pillars, connected to a massive underground seed storages, are transported "seed holders", special containers holding seeds of various world flora, but also a genetic material.
So, with access to this sort of a "tube mail", one could rebuild whole Earth. But, as shown in the cinematic, lot of seed holders are already empty and most of the pillars are inactive or corrupted, as the place has been raided many times (hypotheticaly). Whole cinematic revolves around this one specific drone, designated to scout the lands and search for the last remnants of previous (human) civilization - in form of seeds.
Pre-production
At first, I did some initial pitch, scene blockout and initial asset list and presented it to Jan. From there it was an iterative process of what we can actually achieve with given time and how to approach stylization and design of the individual assets.
Before we jumped into production, I created super simple planning document (we used Google Drive for all our sharing needs) where we put all tasks and ordered them in successive categories (e.g. models first, then textures, lighting, optimization and Asset Store upload / promo materials last). This gave us an easy way of tracking our progress and pool of tasks to choose from, though the document was live and constantly evolving until very end. Tool is only a tool if it's helpful - if you don't over-manage things, it will speed up your workflow and help you avoid forgetting something important.
Next was defining the project folder structure and naming conventions for all asset types. Again - I can't recommend enough doing this as early as possible for any project, as it extremely speeds up workflow for all team members involved. Basically, keep things clean and organized all the time.
Modeling
We utilized classic pipeline of baking high-poly data into normal maps, as we wanted to keep all assets game ready. All meshes were created in 3dsmax, Jan also used ZBrush for sculpting some of the high-poly models (like stone bridge and twin snakes).
As mentioned before, we went through classic blocking phase first, where we would lay out basic composition, dimensions and environment modules. It always helps me to make blockouts from super rough modules right from the start, but with correct pivots. Then we can just disect the whole scene back and just re-save models as they get finished. Scene gets updated constantly without need to position the finished modules again.
Texturing
One of the requirements of the challenge was to use Substance Suite, so we went with Painter as our main texturing tool, since none of us have extensive knowledge of the Designer.
Some of the materials were created from scratch, but usually we went with base and smart materials from various sources and tweaked them further to our needs. Those sources were Substance Share and amazing libraries IIF Steel Collection (by Munkhjin Otgonbayar) and 20 Smart Material Mix (by Aleksey Kudryavtsev).
Rendering
This was our first experience with HDRP (if you don't count quick research when it became available), so we had to learn it along the way.
Detail maps were a bit of a mystery at first, as we were used to just detail normal maps, while Lit material allows use of Detail Masks, where R channel is desaturated albedo, G is normal Y value (green channel of normal map), B is for smoothness, and A channel stores normal X value (red channel of normal map). In order for detail maps to appear in material, B channel of main Mask Map needs to have some value (cannot be black).
Lighting
I decided not to go with physically accurate light setup, as we aimed for some stylization and the dark environment would probably suffer from that. Scene is using Realtime GI setup without any lightmaps (except pre-computed GI), so all the lights in the scene are realtime, most of them casting realtime soft shadows with resolutions ranging from 512 to 4096 (for key lights). Realtime shadows were enabled even for several point lights, which is pretty expensive for a real game scenario (you would use cookies instead), but in our case the framerate was still in OK levels.
Massive boost in establishing atmosphere was thanks to the volumetrics, which is used for the main height/distance fog and DensityVolumes for light shafts. Large DensityVolume at the bottom of the Chamber allowed me to create pitch black darkness below the bridge, while having nice soft falloff as it gets closer to the light.
Post-processing
Project was recently converted into Unity 2019.1, which required reauthoring some of the assets, especially switch from Post Processing Stack V2 to V3, where everything is unified into Volume Profiles instead of Post Process Volumes and Layers.
Main Volume Profile is set to Global, and it manages main scene rendering, like shadows, fog, screen space reflections etc.
Then there are two Volume Profiles covering each room, as they needed different treatment in terms of color grading, bloom etc.
As for the cinematic, each virtual camera (there are 20 of them) is using own Profile dedicated from Hallway / Chamber Profiles, as each shot required some tweaks, mainly color grading again.
Foliage
With foliage, we would definitely go with photo-scanned assets (like MegaScans), but since this wasn't allowed, Jan modeled and rendered simple flat grass with alpha channel, textured it in Painter and prepared several batch variations.
For the static version of the grass material, I used default HD Transmissive shader in Unity, but also created custom vertex animation shader using Shader Graph to simulate wind. For the most part, it was based on a handy tutorial by Brackeys, but instead of using linear gradient UV for defining moving/static areas, I used Vertex Color node with vertexes colored in 3dsmax, which gave slightly better results in grass bending.
Ivy hanging throughout the whole scene was generated procedurally using old school 3dsmax plugin called gwIvy, which is unfortunately not supported by the author anymore, but sure you can find it around the web. Ivy is using just two materials, leaf and tileable root surface. At first, we wanted to model ivy by hand to have absolute control over it, but it turned out to be time consuming and not necessary at all.
Cinematic
After the challenge deadline I took another month to setup Cinemachine and animated short sequence for promotional video. I didn't want to make traditional flythrough with background music to present the asset, so I came with a little backstory of a drone sent by one of the robots to scavenge the last seeds.
As mentioned above, cinematic is using 20 virtual cameras, 10 for a Hallway segment and 10 for a Chamber. Most of the cameras are animated manually, with only few having Look At Target (Drone) and procedural Aim.
Each shot has it's own "folder" with dedicated objects just for that shot, like animated Drone, particles etc. This was essential for easy manipulation in Timeline, as shots could be added/removed/changed without affecting other shots.
Instead of using After Effects, I decided to animated drone HUD inside Unity as well (except the glitches), so the sequence in editor is complete. HUD and pop-up dialogues are just textures with alpha in front of the camera, although I can imagine this would be perfect scenario for the Visual Effect Graph.
Titles and sound has been added later in Premiere, but most of the sequence is really just rendered in 4K right from the Unity (thanks to the Unity Recorded, which I used also for capturing screenshots). Even our Polygonautic logo has been animated and rendered in Unity!
Conclusion
Inside The Vault challenge was a great experience, as we both learned lot of new stuff, especially how HDRP works. For me it was also an opportunity to finally try some of the new Unity tools, like Shader Graph and Visual Effect Graph, which are really cool to work with.
Thanks goes to our friends & colleagues for providing feedback on the cinematic and to you for reading through this post. Enjoy the Seed Hunter!